
Read the game / AFL positions
AFL positions explained
Who plays where on an AFL oval? Meet the forwards, midfielders, rucks and defenders—and learn why a team sheet is only the starting point.
Start with the labelled oval, then use the position key to decode the abbreviations you see before a match.
The quick answer
A men’s AFL team has 18 players on the ground. A traditional team sheet shows six forwards, six midfield players including the ruck, and six defenders. We highlight the ruck separately because its aerial contest role is distinctive; it is already included in that total of 18.
These are useful names for learning the game. Modern teams rotate players, move together around the ball and use different attacking and defensive shapes. A forward does not have to stay in the forward half for the entire match.
AFL positions on a labelled oval
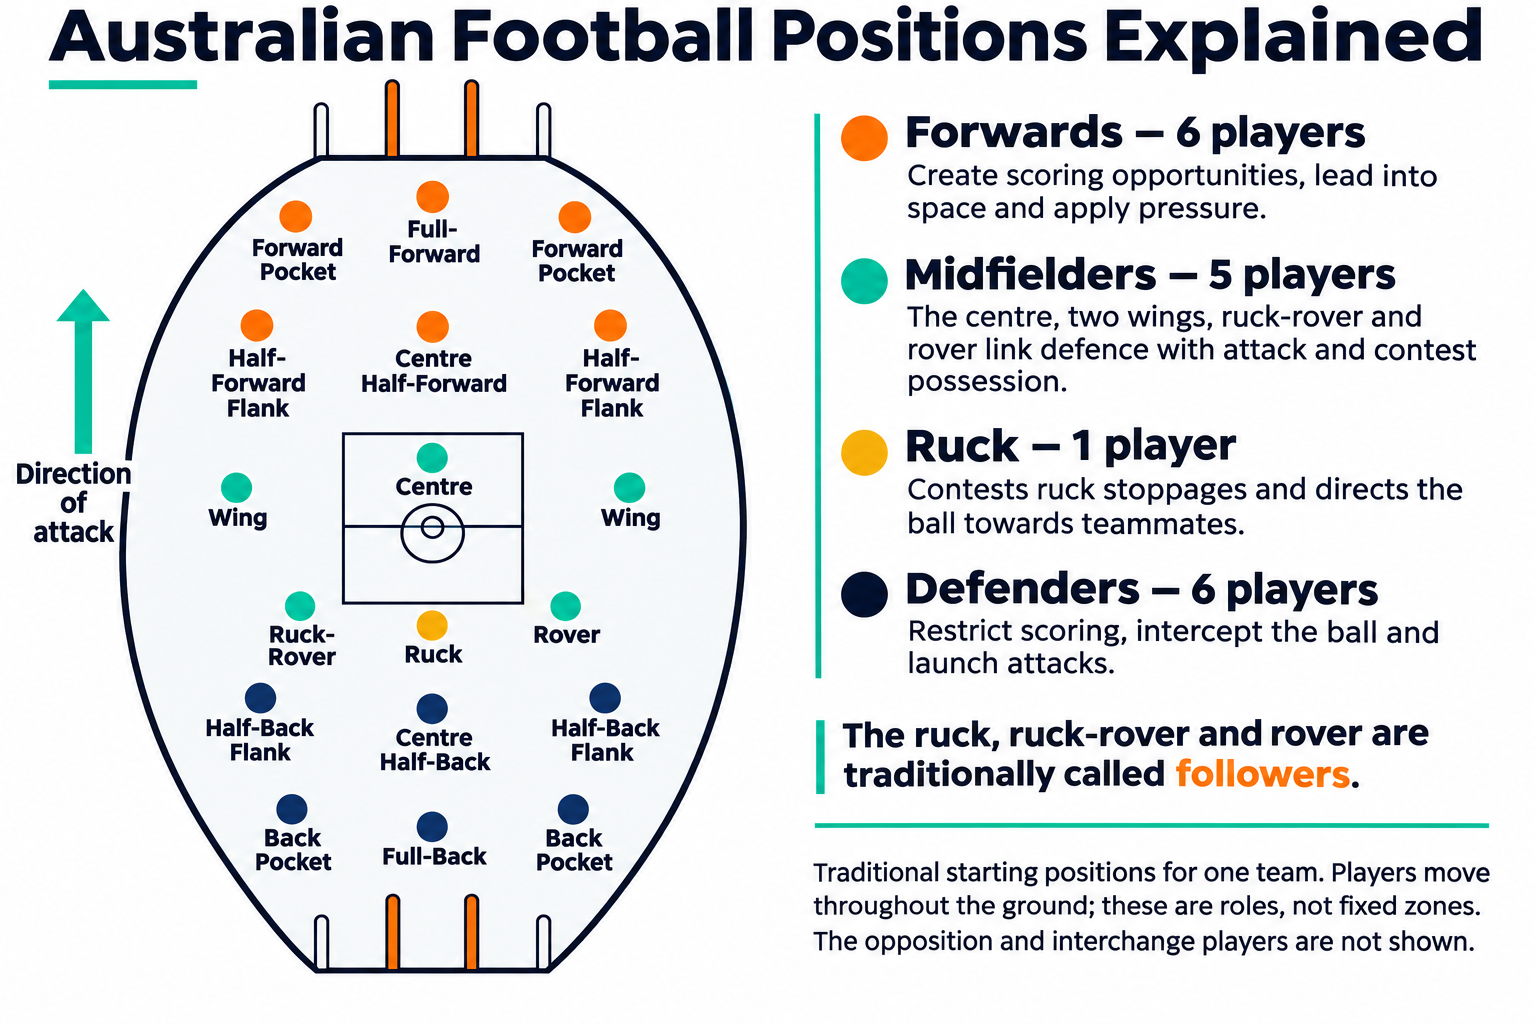
How to read the oval
The goals your team is attacking are at the top. Its defenders are shown towards the bottom, protecting the other end.
- Forwards — 6
FF, two FP, CHF and two HF. Start by finding the players offering targets near the attacking goal. - Midfielders — 5 shown in teal
C, two W, RR and RV. They connect contests and move between attack and defence. - Ruck — 1 shown in gold
R is part of the six-player midfield group, not an extra nineteenth player. - Defenders — 6
FB, two BP, CHB and two HB. Look for how they protect space and respond to their opponents.
Use this picture to understand a team sheet. During live play, look at the ball, opponents and available space rather than expecting everyone to stand on a marker.
The four role groups explained
Forwards: create and finish chances
Forwards need to make themselves available for a pass, compete when the ball arrives and turn opportunities into shots. A taller target and a player gathering a spill can contribute to the same attack in different ways. After a turnover, watch the forwards nearest the ball: their pressure can stop the opposition moving away cleanly.
Midfielders: connect the ground
Midfielders work between contests, teammates and open space. A player close to the ball may try to win possession; another may move outside the congestion to become the next passing option. Wings provide width, while on-ball players work around stoppages. Their responsibilities also include reacting when the other team wins it.
Rucks: influence the first contest
The ruck competes at throw-ups and boundary throw-ins, trying to give teammates a useful first touch. A tap does not guarantee possession: the players gathering the ball and the pressure around them still matter. Watch what the ruck does after the restart as well, rather than following only the initial aerial contest.
Defenders: protect and restart
Defenders try to deny space and scoring opportunities. Sometimes that means staying with an opponent; sometimes it means judging where a kick will land. Once the ball is won, the defensive group also needs a way out. A safe short pass, a carry into space and a longer relieving kick serve different purposes.
Every abbreviation in the diagram
| Label | Position | Players | Main idea |
|---|---|---|---|
| FF | Full-forward | 1 | Provides a target close to goal and looks to finish scoring chances. |
| FP | Forward pocket | 2 | Works beside the main target; looks for loose balls and close-range chances. |
| CHF | Centre half-forward | 1 | Offers a target further upfield and links midfield delivery with the forward line. |
| HF | Half-forward flank | 2 | Connects play into attack and helps apply pressure when possession is lost. |
| C | Centre | 1 | A central midfield role, connecting contests and the next passage of play. |
| W | Wing | 2 | Works along the sides and links the defensive and attacking parts of the ground. |
| RR | Ruck-rover | 1 | A traditional on-ball role around contests; often discussed simply as a midfielder today. |
| RV | Rover | 1 | Another traditional on-ball role, looking to gather the ball around stoppages. |
| R | Ruck | 1 | Contests aerial restarts and tries to direct the ball towards teammates. |
| CHB | Centre half-back | 1 | Defends a central route into attack and can help intercept or launch the next possession. |
| HB | Half-back flank | 2 | Helps defend the flanks and carry or distribute the ball out of the back half. |
| FB | Full-back | 1 | A deep defensive role, often responsible for a dangerous forward near goal. |
| BP | Back pocket | 2 | Defends close to goal alongside the full-back, including opponents working near the pockets. |
Some team sheets use CF for centre half-forward and CB for centre half-back. Here we use CHF and CHB throughout. Full names are the same.
Three things to watch in your next match
- Before the kick: find the player moving into space ahead of the ball. Notice whether the movement opens a passing lane or takes a defender away.
- At a stoppage: separate the ruck contest from the next touch. Who gathers it, and who becomes the outlet?
- After a turnover: watch how quickly players change jobs. The team that was attacking now needs to protect space and stop the next pass.
These viewing prompts are a beginner’s way to follow movement, not a claim that every club uses the same tactics.
Common questions about AFL positions
Is there a goalkeeper in AFL?
No designated goalkeeper position appears in the traditional team sheet. The full-back is a defender, not a soccer-style keeper with separate ball-handling privileges.
Do players have to stay in their position?
No. Position names do not confine players to permanent zones during general play. There are specific starting-position requirements for centre throw-ups, so do not treat this schematic as the legal restart arrangement. The rules guide and current competition laws explain play separately from tactical roles.
Is this also the AFLW formation?
This diagram is for a traditional 18-a-side team. AFLW uses a different on-field player count, so it should not be read as an AFLW lineup. Role names are useful across formats, but check the competition and age group before applying a formation.
Sources and illustration notes
Reviewed 1 November 2026. Names and traditional grouping: AFL’s introductory school resource and Collingwood’s position key. Team size and centre throw-up requirements: AFL laws and interpretations. Examples of role flexibility and ruck/forward craft: AFL Victoria’s 2026 ruck and tall-forward profiles.
The vector drawing, layout and viewing examples were created for SportsPedia. No club artwork, player photograph or official diagram was copied. This is an explanatory guide, not a coaching prescription or a fixed map for every passage of play.
Keep learning AFL
Connect each role with its match numbers in AFL statistics explained, including disposals, tackles, hit-outs and clearances.